How to Run a Faster Half Marathon or Marathon Tomorrow

How to run a faster half marathon or marathon

It goes without saying, that to run the fastest half marathon or marathon that you are capable of, you need to do a fair amount of training.

But, what if all the training is behind you, and your race is in a couple of days. Is there anything you can do,  RIGHT NOW, to minimise the amount of time you’re out there on the course?

Well, just so happens… there is!

Sleep

Try to get a good night’s sleep two nights before your race. Obviously, it would be good to sleep well the night before the race as well, but this doesn’t always happen. Pre-race nerves, and often an early wake up call can mean that you don’t always get a great night’s sleep the night before the race. The penultimate night’s sleep is the one that’s supposed to count.

Carb Loading

Carbohydrate loading is likely to improve your performance by up to 3%, in the marathon, and also in the half marathon, if you anticipate running it in around 90 minutes or more.

If you’re on track to be running a 3:30 marathon, that could mean you’ll run around 3:24 if you carb load!

How to Carb Load for the Half Marathon or Marathon

It’s a very simple protocol.

  • For the 24 hours before start time, do as little exercise as possible.
  • For every 1kg of body weight, consume 10 grams of high glycaemic index carbohydrate-white bread, white rice, white pasta. Very little fat and very little fibre.

That’s pretty much it, but I’ve written a full article on carbohydrate loading which you might like to look at.

Plan Your Race

Go to the race website, and double check you know what time you start, where the toilets are, where the drinks stops are, baggage drop, or anything else that could send you into a panic if things go awry.

Take a look at the race profile, and plan your pacing accordingly. If the first few ks of the race are hilly for example, you want to make sure you take it easy at the start. You’ll be itching to get going at the start of the race, particularly if you don’t have that much race experience, and running the first few ks too fast can set you up for failure at the end.

Likewise, be aware if there are any “false flats” on the course. These are longish stretches of slightly rising hill. They look flat, but once you start running them, you’ll feel the pinch. If you’re not already aware that you’re actually running uphill, it could see you either running too hard to try to keep to some predetermined goal race pace, or get you thinking you’re starting to blow up, when in fact you’re just running up a hill!

Strategies for a Hot Marathon or Half Marathon

Be aware of what the weather’s likely to do. If you’re likely to be running in the heat, there are a few things you can do.

Adjust your pace accordingly, from the start of the race. Running in the heat can really take its toll. The first part of the race might feel relatively easy, but the faster you run, the faster your body will heat up, and the sooner your brain will start inhibiting the recruitment of muscle fibres – meaning you’ll start slowing down.

Pre-cool before the race. If you’re driving to the race, have the aircon on in your car, drink cold slushies, suck on ice. There’s a great article on pre-cooling here 

Pour water on your head whenever you can. One study showed that head cooling during exercise in hot conditions increased cycling time to exhaustion by 51%!

Use a neck cooler whilst you’re running. One of those fabric things that are filled with some kind of jelly-crystal type substance. (that helps – not!). If you’ve left it till the last minute, you can grab one at your local Kathmandu store, but you can definitely get them cheaper elsewhere. Maybe the two dollar shop would be a better bet.

I’ve written about strategies for training and racing in hot weather previously.

Use Pace Runners Wisely

Your first aim at the start of the race should be to settle into a rhythm you feel comfortable with. Ignore the pacers for the first quarter of your race. Run on how you’re feeling on the day. Once you’ve run about 25% of the race, have a look around for a pace group you might be able to run with. If you think you might run with a pace group, you need to read this article on how to run with a pace group wisely. There is quite a bit to consider.

Do You Need to Warm Up for a Marathon or Half Marathon?

The answer is probably not, at least not in the traditional sense.

If you’re likely to be out on the course for 2 hours or more, then conserving your glycogen before the race is really important. Glycogen is the most readily available source of fuel in the body, so you want to keep it topped up before you actually start racing.

It takes a couple of hours for your body temperature to reach optimal level and for you to become fully awake, so try to wake up a couple of hours before race start time – which is not fabulous if you’re starting at 6am!

Go for a light jog as soon as you wake up – just 10 minutes or so.

Do some light stretches – stretch out anything you know tends to get a bit tight.

Have breakfast, use the loo, then make your way to the race (where you will most likely use the loo again!)

Unless you’re an elite runner, you’ll be standing at the start line for quite some time. That standing around in the starting corral can all but negate a warm up if you were to do one when you arrive at the race, so you’re better off employing some of these other strategies once you get to the start area.

Take the Shortest Possible Route

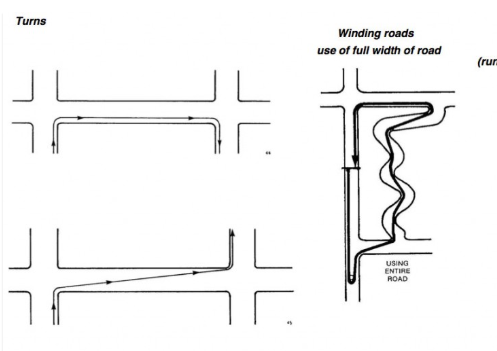
Once you’re off and racing, stick to the shortest route by hugging the curves in the road tightly.

Consider this. On a 400m track, each lane is 7.67m longer than the lane directly inside it. Lane 1 is 400m long, Lane 8 is 453.66 m long! (Which is why they have the stagger).

That’s an extra 25.33m for each of the 2 curves on the track. Lane 8 is only 8.5m out from lane 1, so if you run a curve in the road that is similar to a curve on the 400m track, and you run it on the outside side of the road, you’ve already run 25.33m further than you need to.

If you think about it in those terms, you can see how much distance you can save if you run the most direct route possible. The race is measured on the shortest possible route, so if you deviate from that, you’re running further than you need to.
Running the shortest possible route means keeping your wits about you and being aware of what’s coming up ahead of you. It will often mean running diagonally across the middle of the road as it curves in one direction then the other. Be sure you’re not impeding people behind you by crossing over in front of them.

Here are some examples of taking the shortest possible route.
There are real benefits to be had by employing all of these strategies to run the fastest race you’re capable of on the day. Hopefully, using them will help you to a personal record.

If you’re ready to take your training to the next level with a personal online running coach, we’re here to help.

How To Train For A Marathon.

In this interview, our very own Richard Sarkies talks about his 40 odd year running career, and the reason his marathon training started nine months before race day!

Watch the video, or you can listen to audio only.

00:25 – Running career highlights
01:30 – Coaching career highlights
02:38- City to Surf PB
03:00 – Running a marathon by mistake
03:50 – Other marathons
05:00 – 20 years in a nutshell
05:50 – Injury prevention
08:30 – Fund raising
09:30 – Why a 9 month lead in to the marathon?
10:15 – Mileage and intensity
12:50 – Cross training
15:00 – General nutrition
17:05 – Training run nutrition
19:00 – Race day breakfast and race nutrition
22:05 – Avoiding loo stops
23:00 – Training surfaces
24:10 – Using a GPS vs training and racing on feel
26:35 – Race plan
29:10 – How to prevent blowing up

If you want to take your running to the next level, you can start training online with your own personal running coach now.

Half Marathon Tapering

half marathon taper time

What is half marathon tapering?

Tapering for a half marathon means cutting back on your training so that you can be in peak physical fitness for the race. During the taper period you should stick to your usual training routine, but reduce the volume of running you do in each training session. Tapering is one of the most important aspects of any half marathon or marathon training plan, but it can be one that gets the least attention.

It can also be hardest to implement, since most runners like to well… run, and find it hard to cut back just as their big race looms.

Don’t expect to feel good after just a few days of easy running. It could take up to 10 days before you fully recover from your last hard workout, so you may feel a bit sluggish right up till a couple of days before the race.

Why you should taper for your next half marathon?

  • Training adaptations happen when your body is in recovery. You work hard and stress your body, a small amount of damage happens, the body repairs itself and comes back stronger ready for the next onslaught! It can’t repair itself if you don’t give it some downtime.  During the taper period, you can gain strength in your muscles and connective tissue.
  • In periods of high training, levels of muscle glycogen, antioxidants, hormones and enzymes become depleted. The tapering period is a time for these to all return to optimal levels.
  • You won’t so much get fitter during the taper period as re-energise and allow your body to build itself back up to be stronger than it was when you were putting yourself through all that heavy training.
  • Your immune function also improves as you drop your training volume

If tapering improves my immune function, why do I get sick during my taper period?

When you’re in heavy training, your immunity can be reduced. Heavy training sessions of more than 90 minutes can make you more susceptible to picking up a bug for up to 72 hours after your workout. So when you’re working out a lot, you’re quite susceptible to picking something up.

Avoid junk food during half marathon taper

The reason for this seems to be that during heavy workouts, the body produces hormones which temporarily lower immunity. You produce more of the stress hormones cortisol and adrenaline. These hormones raise blood pressure, raise cholesterol levels and suppress the immune system.

The last training session you do before you begin your half marathon taper will be a pretty long run. If you’re an experienced runner,  that long run might include some speed surges, hill efforts or a fast finish. Whatever it is you do in that session, it’s more than likely going to be up there as one of the harder sessions of your training block. You will, therefore, be susceptible to getting sick for 3 days after this training session.

The incubation period for a cold is between one and three days, and for the flu one and four days. So, if you’re exposed to some nasty little viral bugs 3 days after your last long run when your immune system is still suppressed, and it takes another 3 days for those bugs to do their stuff, 6 days into your taper is about the right time get sick. Yes. One week out from your half marathon, and you have a cold.

It’s vitally important to look after yourself during the half marathon tapering period.

  • Get plenty of sleep.
  • Rest-try to reduce the amount of extra stuff you do. Try to organise for your kids to be off your hands for a few hours, forget about the cleaning for a while. Ask someone else to step up to the plate for you in this really important time.  
  • Eat well. Include fruit and vegetables in your diet, along with whole grains. Good quality food – no junk.
  • Use hand wash, use it liberally, and use it often.
  • Stay away from people who you might catch a cold from. I’ve known people to keep their kids out of daycare during a taper period to reduce the chance of catching a bug from them. Stay out of crowded areas. Try not to be near people on public transport. Use handwash after you get off the train or bus.

What’s the Best Way to Tackle Half Marathon Tapering?

Tapering is a highly personalised part of your training plan. The best half marathon taper for you, is one that you’ve worked out through trial and error over many races.  Some people respond well to dropping back their mileage dramatically, others go better on a higher volume in their taper. The best way to figure out what works well for you is to meticulously record your training, year round. Good training notes will include what you did in each training session and how you felt, and of course, your race day results. Include your km splits and what went on in the race for you. Do it soon after your race before you have time to forget how you felt. Keeping detailed records of your taper periods and how you feel on race day will give you a good amount of information to look back on and work out what’s worked best for you.

With the help of a running coach, you can get great results from your taper. A coach will have been through the taper phase with many athletes and will have a good knowledge of what is likely to work for you.

But, if you’re going it alone, there are a few tips for you here.

Half Marathon Tapering Guidelines

Rule #1: Don’t do anything new during your taper. Do less of what you are already doing

Rule #2: Don’t do anything new during your taper. Do less of what you are already doing.

Yep. It’s important. Don’t suddenly start doing stuff you’ve never done before. If yoga hasn’t been part of your regular training, don’t start it now. If you don’t know how your tired body will react to massage, do not have a massage in race week. Don’t eat new foods, go to bed two hours earlier (or later), or decide it’s a good time to get in a spot of gardening!

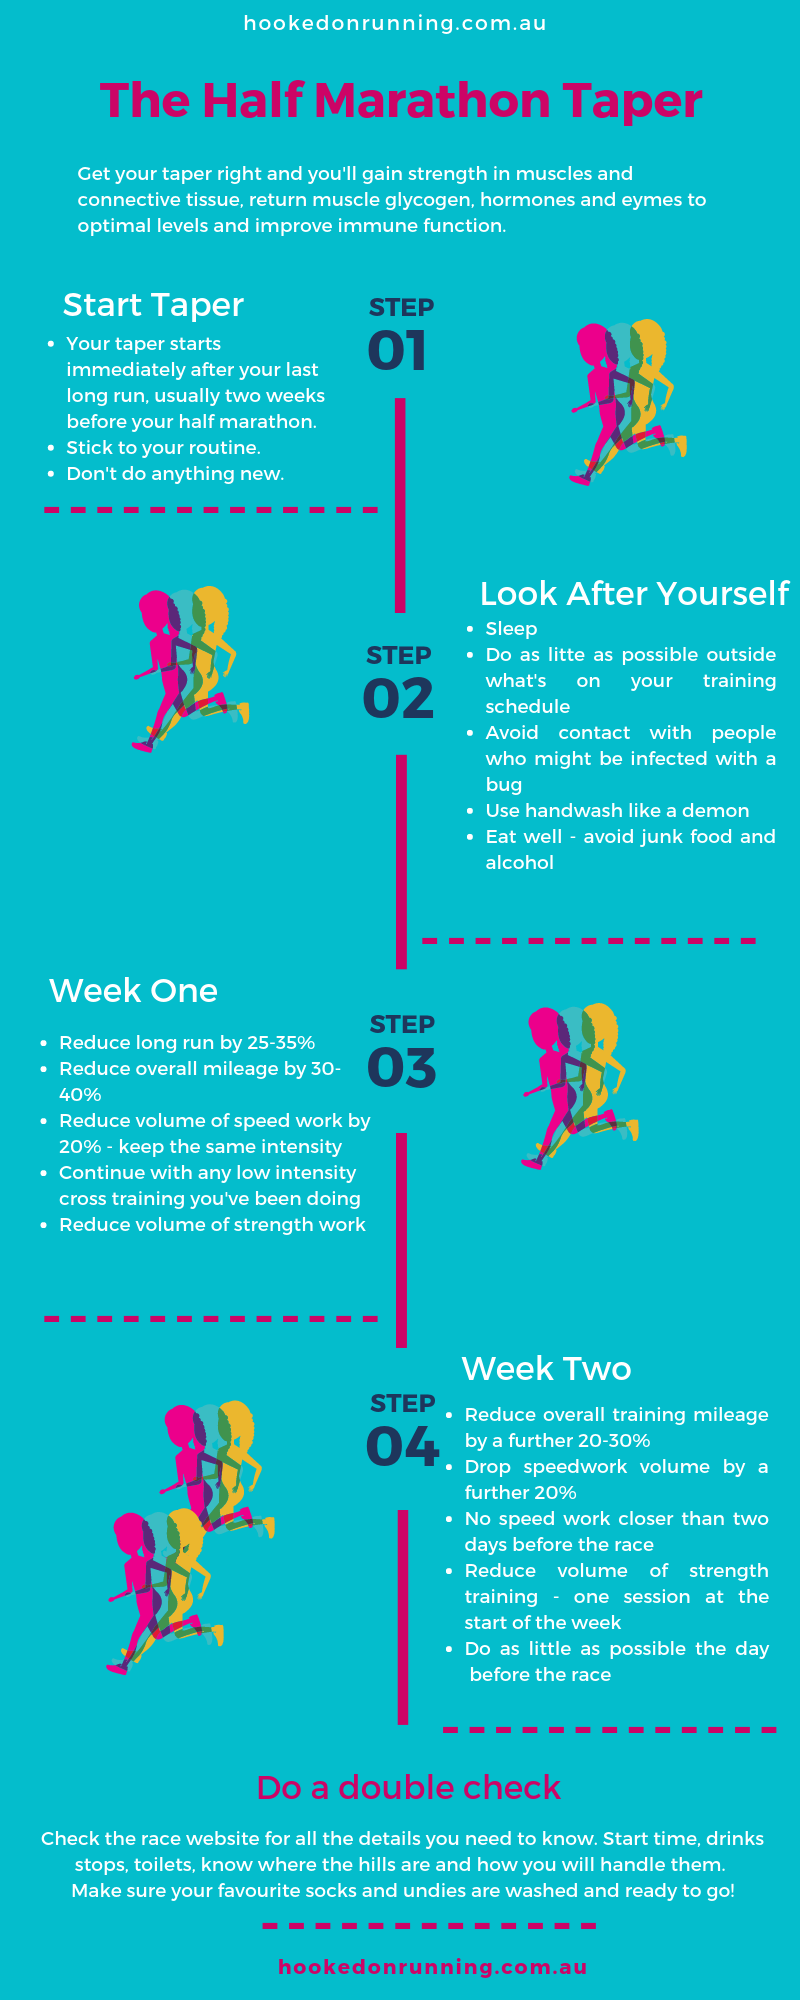
Race Taper Week One

  • Start your taper the day after your longest long run. This will generally be two weeks before race day.
  • Reduce your overall mileage by 30-40% in the first week of your taper.
  • The bulk of the reduction in your mileage will come from reducing the length of your long run. Reduce your long run by around 25-35%. If you opt for closer to a 25% reduction in duration, reduce the load more by running over flat terrain.
  • Stick to the same routine. If you’re used to running 5 times a week, stick to running 5 times a week. The exception to this is if you have any niggles that you need to take care of. If that’s the case, you might need to drop one of your training sessions.
  • Keep up with any speed work you’ve been doing. Keep the intensity the same, but  drop the volume by around 20% in the first week of your taper. .

Race Taper Week Two

  • Reduce your overall training mileage by a further 20-30% leading into race day.
  • Your race will obviously take the place of one of your training sessions, and you shouldn’t run at all the day before your race. You therefore might not have enough days in the week to stick to your previous routine, so you can drop a mid-week session or two if you need to. If you’ve only been doing a couple of mid week runs regularly, you should be able to keep them in your schedule.
  • Drop the volume of your speed work  in the second week by another 20% or so. You should keep the same intensity that you have previously been working out at.
  • Your last speed workout should be no closer than three days before your race.
  • Rest the day before the race. Do as little as possible. Some coaches like people to have an easy run the day before the race, but I prefer a complete rest day to aid with carbohydrate loading.

It’s a fine line between dropping the volume enough to freshen up, and dropping it too much. Remember, you’re likely to still feel a little sluggish up to a few days before the race, so if you’ve already reduced your volume substantially, you should hang tight, be patient, and trust the process, rather than dropping your training further.  This is why it’s important to keep notes on what you do during your taper, and how it makes you feel, so you can use that information to help fine tune your taper for your next race.

Strength Training and Cross Training During the Half Marathon Taper?

I know I’ve said it before, but here it is again. Your taper week is not the time to introduce anything new. If you have already been doing some strength training or other forms of cross training such as swimming or cycling, you can continue with it at a reduced volume. But, don’t start swimming because someone else said it would be good for you!

Week One-cross training

  • In the first week of your taper, you can continue with all your cross training. If your cross training is usually done at an easy intensity, keep doing what you’ve been doing. The exception to this would be if you’ve been doing a 4 hour bike ride every week, or a 2 hour ocean swim! No matter how easy these sessions might be, cut them back. No more than 90 minutes for any easy cross training session in the first week of your taper.
  • If your cross training is of a higher intensity, drop the duration of the workout back by around 40%.
  • You can keep up your strength training in week one, but drop the volume. Keep the same intensity, don’t up the weight you’re lifting because you’ve dropped the volume. You might want to look at doing say 2 sets of an exercise instead of 3, with the same number of reps and the same resistance you have been doing previously.

Week Two-cross training

  • One reduced volume strength session at the beginning of the week – no closer than 4 days out from your race. If your legs aren’t feeling great, you should cut it out all together.
  • You can do another reduced volume non-strength training session (such as swimming, cycling, pole dancing) at the beginning of the week. Best to keep it no more than 4 days out, and no more than 50% of the volume you had been doing in peak training. You can drop it altogether if you feel you still need to freshen up more.

What Else Should You Do During a Half Marathon Taper?

Take the opportunity to fine tune your race strategy. Be sure you know what you need to do, and try to stick to it. Plan your strategy based on how you’ve gone in your training, the terrain of the course, and what the weather will be like. If you’re heading for an unseasonally hot day, be prepared for a slower race.

Reflect on your training. Look back on your training log and know that you’ve done enough. Think back to some great training sessions or races, and remember how you felt. Take confidence from this.

You can also look back on some sessions that haven’t felt so great, but you pushed through to the end, regardless. You had the determination to stick that out, so you’ve got the race covered.

Read the race website from start to finish. Make sure you know what to expect on the route. Where the hills are, where the drink stations are, toilets. Make yourself a check list of everything you need to do to be ready for the race. Wash your favourite socks and undies, make sure your racing shoes are dry…

When you shouldn’t taper

When your training volume has been low

You’ll get the most benefit from tapering when your build up to a race has been fairly consistent. If you’ve missed a chunk of training, you might be better continuing to build up your training instead. If you simply haven’t done a lot of running, you’ve not got much to recover from. A long run the week before the race might be a good way to run yourself back into some form. This run could be the same distance as you did on the weekend two weeks prior to the race, and should be an easy effort.

When your preparation has been less than ideal, continuing to run through what otherwise might have been your taper period can help you  gain a psychological advantage and gain confidence.

When the race is a training run for another event

If the half marathon is part of a training plan for another event, you’ll generally not taper. You might cut your training back a bit during race week. This is less to do with your performance in the race, and more to do with ensuring you’re not overloading yourself too much and risking injury.

Use this handy infographic for your next half marathon taper.

Half Marathon Tapering Guide

How to Warm Up for Your Next Marathon, Half, 10k or 5k Race

Warming up for a 5k, 10k, half or full marathon

Why Should You Warm Up?

Warming up will help prepare your body for the event to come. Warm-ups will vary, depending on the race you’re warming up for, your current level of fitness, and what sort of access you have to a warm-up area.

  • increases the flow of blood and therefore delivery of oxygen to the working muscles
  • increases body temperature which will speed the flow of oxygen throughout the body
  • helps to reduce the risk of injury by lubricating the joints and tendon sheaths
  • helps the heart and blood vessels to adjust to the body’s increasing demands that will be placed upon them
  • improves messaging between the brain and the working muscles which will improve muscle power and contraction
  • a tried and tested warm-up routine which you run through before each race (or hard workout) can settle any pre-race nerves, and get you in the right frame of mind to race

Warming up for a half marathon or marathon

If you are around the 2 hour mark for a half marathon, or you’re running a longer distance, follow the steps below to warm up. If you’re more around the 90 minute mark or better for a half marathon, this doesn’t apply so much to you.

With a race that’s around two hours or more in duration, one of the prime things you need to take into account when warming up, is preserving your energy. You want to use as little glycogen as possible before the race starts.

  • Wake up at least a couple of hours before your race. It takes at least 2 hours to get your body temperature up to optimal level and for you to become fully awake.
  • As soon as you wake up, go for a light jog or walk for 10 minutes. If you’re running, be sure to keep it very easy.
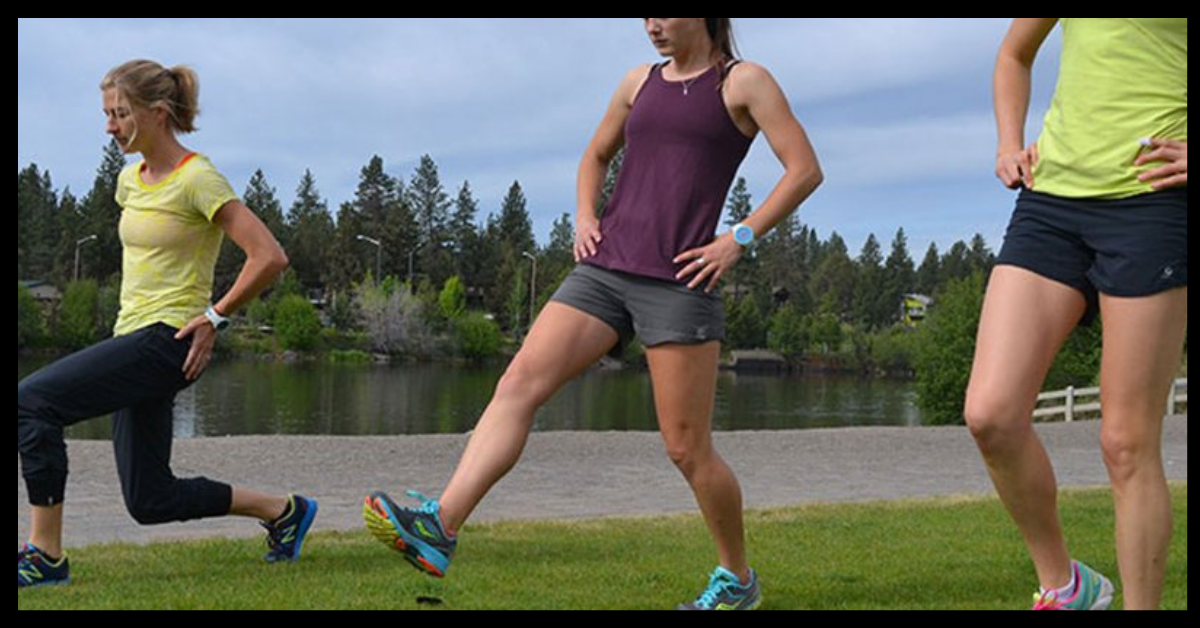
  • Include some light stretches. Stretch out anything you know tends to tighten up. Include some lunges forward and backwards as part of your stretching.
  • When you’ve finished your light warm up, have breakfast. This is important as it will help to replace any glycogen you’ve lost overnight, and in your warm-up shuffle.
  • Use the loo. That little warm up shuffle gets every muscle primed, including those of your digestive system!

At the starting line

Unless you’re an elite runner, you’ll be standing at the start for quite a while.

  • Keep warm. Wear old clothes which you can throw away. (They’ll be collected and given to charity). You want to expend as little energy as possible at this stage of the proceedings, so the last thing you want is to be using your energy to keep warm.
  • If it looks like rain, wear a rain poncho or an old garbage bag. You can put old shopping bags on your feet to keep your shoes dry. You might want to think about wearing an old pair of shoes you can throw away, or at least take a fresh pair of socks you can change into just before the start. There’s nothing like starting off in dry feet-even if it lasts less than a minute!
  • Keep these clothes on for as long as possible. You don’t have to take them off before the start. You can run the first 5 minutes or so in them, then take them off and leave on the side of the course. This doesn’t really apply to tracky dacks of course, but a light jumper and some gloves are easy to shed once you warm up.
  • Warm up your legs by doing lunges and squats, and leg swings. Ideally, this won’t be the first time you’ve ever done a lunge before a run! It’s always good to practice these things prior to race day.

The first few kilometres

  • The rest of your warm up will really happen in the first couple of kms of a 2 hour run. It’s not that critical to be primed to blast off as soon as the gun goes. You want to be a bit slower than your goal race pace in the first few kilometres anyway. This will give you a chance to get a handle to how you’re feeling on the day, and the sort of pace you will be able to settle down into.
  • Be careful not to get caught up in the excitement of the race. Always think of the first 2k as a chance to complete your warm up and test the waters as far as how you’re feeling on the day.

Warming Up for a 5k, 10k or a Fast Half Marathon

  • Start your warm up about 40 minutes before the start time. This will give you time to warm up and get to the loo before the race.
  • Have a very easy run for around 10 minutes.  It should not feel difficult at all
  • If you normally stretch before a workout, you can stretch for 5-10 minutes. If you don’t normally do that, don’t start now. Some dynamic stretches such as lunges, ankle rotations, and leg swinging can help to loosen you up for the race. Holding a prolonged, strong static stretch is not recommended prior to racing. (For example a hamstring stretch which you find a bit painful and you hold for 30 seconds or more)
  • Run  3-4 thirty-second efforts, at a pace slightly above your goal race pace. You should use the first one to build into that pace. Have 1-2 minutes rest between each of these.
  • Go the the loo
  • If you’re going to be standing around before the race start, keep warm, and shed clothes just prior to the start.

Ideally, this warm up routine would finish about 5 minutes before the race start. It’s the nature of large fun runs that you won’t be able to do this though. There are usually queues for the loo, and often not much room to warm up. Try to finish your warm up as close as possible to the race start time. You need to balance this between the panic you feel when you’re still in the loo queue when there are two minutes till the start!

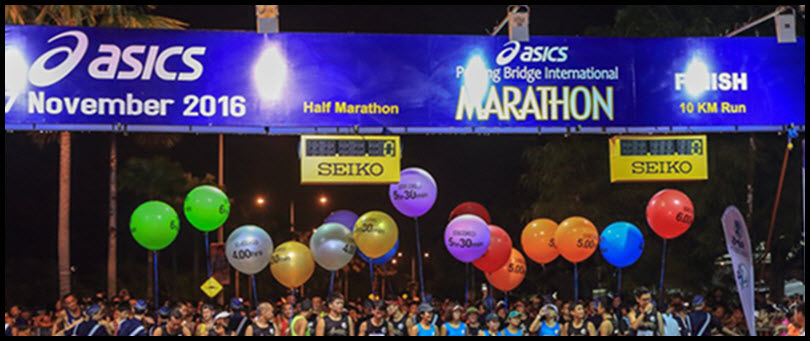
Pace Runners: How to Use Them Wisely

How to get the most out of a pace runner

Do you struggle a bit with pacing yourself in those races you’ve trained so hard for? If so, you’re not alone. So it makes sense to use a race pacer in your next big event, right?… Or not

Most big races these days have race pacers which will help you to get to the finish line on target. Pacers are expected to finish on their pace time, or no more than 2 minutes faster. It sounds like a good strategy to hook up with a pace group and hang onto them for  as long as you can, but running with a pace group isn’t always the best way to hit get your best time.

Consider This When Using a Race Pacer

  • Race oganisers often ask local running clubs to supply pacers. It’s possible your pacer is pacing a group which is only slightly below their own ability – which means if the pacer is having a bad day, they are going to find it hard to make the target time themselves, let alone help you to reach your target!
  • Usually, pacers are targeting a time which is quite a bit slower than their ability – which does come with it’s own issues. The pacer is most likely running at an easy or easy/moderate pace to hit the target pace that you have to work so hard for. They therefore won’t need to vary their pace over different terrain. For example, let’s say you’re aiming for a 1:50 half marathon. Your average pace will need to be a bit over 5:10 per km. But your pacer might be able to complete a half marathon at 4:10 per km pace. They can easily maintain 5:10 per km going up a hill,  but you most likely can’t without burning too much gas. Sticking with the pacer as they power up a hill could cause you to blow up later in the race. Because the pacer doesn’t need to employ optimal racing pace to achieve the target time, an inexperienced pacer will stick to the same pace, kilometre after kilometre.
  • Pacers are keen to get you to the finish line within your goal time. Sometimes a bit too keen. Because they have the ability to run quite a bit faster than your goal pace, it won’t matter to a pacer if they run too fast at the start – they will have no problem finishing the race still in the target time, but you will.
  • Don’t assume that all pacers have a lot of experience, either as pacers, or even as race participants. Like the rest of the field, pacers come at all experience levels. And just like the rest of the field, there will be some pacers who think that if they take you out faster at the start, you can “bank” time, and afford to drop off a bit at the end. Really, that strategy just won’t work. And logically, if you go slightly slower at the start, you won’t have to slow down at the end!
  • I remember seeing a post once from a pacer which showed her finish time as 17 minutes faster than the target time, and the caption “Whoops”. Imagine if you’d been following this pacer – any hope of hitting your target time would be out the window (unless you’d grossly underestimated your ability and you did a massive PB by staying with her!)
  • Most recreational runners over estimate the speed they can run a race in, and women are more overconfident in their race time predictions than men. Choosing a pace group when you are likely to have over estimated your ability, and sticking with that pacer, even if you feel the pace is a bit fast for you, is the worst race strategy possible!
  • Pacers usually pace on gun time, not on their timing chip time, so they start timing your race from the moment the gun goes, not from the time you cross the start line. If it takes you two minutes to get across the start line, the pacer could be aiming for a target time which in real time will be two minutes faster than their pace time. In a half marathon, that could be six seconds per km faster. That doesn’t sound like much, but it’s a fair whack kilometre after kilometre.

How to make good use of pace groups

Don’t get too attached to a pace group at the start of the race

Your first priority when you start an event is to settle into a good rhythm and pace you’ll be able to maintain for the entire race. It’s easy to get caught up in the excitement at the start and go out too fast, and that applies to pacers as well. For the first quarter of your race, ignore the pacers. Spend this time settling into your race, and run on how you feel. After about the first 5ks in a half marathon, and the first 8-10km in a marathon, have a look around for a pace group which is running around the same pace as you are.

Don’t get too attached to a pace group during the rest of the race!

Each of us have our own strengths and weaknesses, often related to terrain. You might be an awesome uphill runner, but struggle to make up much time on the downhill. Or you might be able to power downhill like their’s no tomorrow, but tend to fall off a bit on the uphill segments. How much you will lose and gain on the hills is a very individual thing, so be prepared to fall off the group if you know you’ll be able to catch up a bit when the terrain is more suited to your strength.

Be prepared to feel good (and not so good)

There’ll be parts of your race where you feel like a god, and there will probably be parts of your race when you question the wisdom of ever entering the event in the first place. Whilst running with a pace group can help you through these rough patches, it may also push you to run faster than you’re up to at that point in time, and spoil any chance you have of hitting your goal time.  Sometimes you’ll just have to run parts of your race slower than planned. At these times, you’re mentally a bit fragile. If you’re not prepared for it, dropping off the pace group could be the straw that breaks the camel’s back. Conversely, when you’re feeling good, you want to be able to capitalise on that, so staying with the pace group may hold you back.

Move away from the group at water stations

If you’re running in a big pace group, it might cause overcrowding at water stations, or when you’re running  around tight bends. You should consider either moving forward of the pace group before water stations if you’re feeling good, or be happy to drop off the back a bit. You want to be sure to take on board the water you need, and you also want to avoid tripping in that crowded water station or tight bend.

Ask the pacer what their strategy is to get you to the finish on time

Once you’ve settled into a good rhythm and pace and you’ve found a pace group that suits you, ask the pacer what time they have on their watch. If you’re aiming for a net time (that is the time from when you cross the start line until when you cross the finish line), this could make a difference to how you use the pace group. If the pacer has 30 minutes on her watch, and you’re only at 28 minutes because you started your watch when you crossed the start line not when the gun went, you know you have 2 minutes up your sleeve. So if the pacer is urging runners on and you’re not feeling like you can go with them – keep in mind that they are running for a gun time, not a net time, and that you can afford to let them get away on you a bit and still finish on target.

Ask the pacer if they are planning on running even splits – each kilometre the same pace, or if they are taking hills and fatigue into account. You can use this information, along with your own sense of how you’re feeling, to keep on top of things mentally through the race. If you know the pacer isn’t going to slow down going up a hill, but isn’t going to get much faster down a hill, it makes it a lot easier mentally to let them go, if you know you can catch up on the downhill.

I’m all for people who give up their time to help other people reach their goals, so I applaud pacers. For the most part, they do a great job. They don’t intentionally go out too fast, or push too hard up a hill. They just don’t realise that to keep up the pace, you’re pushing yourself every step, whilst they’re breezing through the race as if it’s a training run! At the end of the day, you have to race on how you feel. Pacers can be good motivation, but you need to trust your instincts. Talk to the pacer to find out their race plan, make use of them and their surrounding group for motivation, but if you can feel you’re really struggling to hold onto a pace group, or you feel they are holding you back, your best bet is to let go.

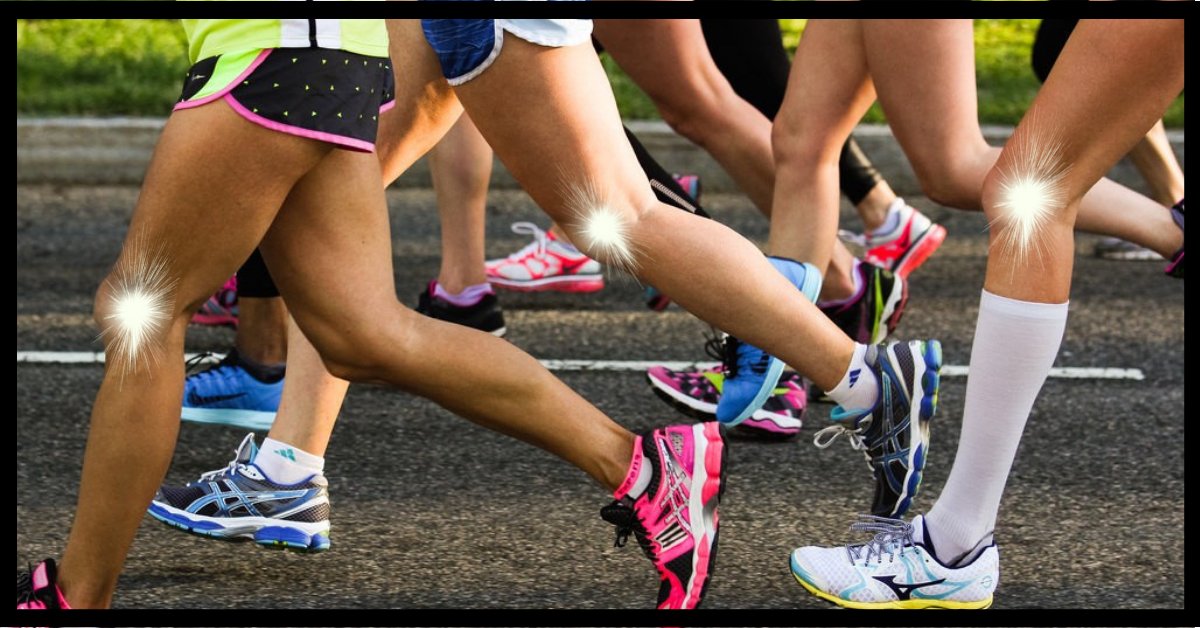
Knee pain Running Downhill: ITB Exercises

ITB Syndrome is worse on the downhill (1)

When running downhill becomes a pain in the ITB

To a runner suffering from ITB Syndrome, nothing says “hello knee pain” more than a good stretch of downhill terrain. For the uninitiated, ITB stands for Iliotibial Band. Whilst ITB Syndrome is an overuse injury, it can strike anyone, anytime, without warning. It is more often found in runners than in the rest of the population, but it’s not the exclusive domain of runners.

What is an ITB?

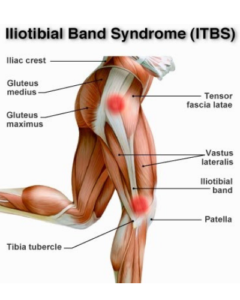
Your iliotibial band is a band of fascia which starts off near the outside of your hip. It then runs down the side of your leg and attaches into the kneecap and the two shin bones. The purpose of the ITB is to stabilise both your pelvis and your knee.

How does the ITB cause pain?

ITB pain can  sometimes be felt in the hip, where it’s thought the ITB causes friction over the bursa that sits between your hip joint and the ITB. The bursa is a little sac of fluid that adds cushioning to the joint. Bursae can be found in joints all over the body. 

It is far more common for the ITB to cause pain on the outside of your knee. What is actually happening to cause the pain is still up for debate.

For quite a while, it was thought that the pain was caused by the ITB rubbing backwards and forwards on the bone underneath it. The condition was known as ITBFS – Iliotibial Band Friction Syndrome.

Then new research showed that actually, the ITB is attached to the bottom of the thigh bone -meaning there couldn’t be any forward and backwards movement, leading to the conclusion that ITBFS, was in fact just ITBS – (that is, the F for FRICTION is taken out of the acronym, as no friction is created if the ITB is not moving). It was then posited that the pain in ITB Syndrome is caused by compression of fat structures, inflammation of bursae, or possibly due to structural changes in the ITB. 

Fast forward a few years, and new research has shown that in fact the ITB does move, so could it be that the pain is caused by friction after all?

Pretty much, no-one’s quite sure exactly what is going on down there.

Read enough? Jump down to some strength training videos

Why does your knee hurt more when you run downhill if you have ITB Syndrome?

Ankle Stiffness

When you’re running on any type of terrain, the shin moves forward and downwards towards the foot and it should also rotate and twist inwards a small amount. So you need good mobility (enough but not too much) in your ankle joint. If your ankle is a little stiff and can’t move properly in these different directions, excess forces are likely to move up to the knee. The knee might be forced to bend or rotate more than it should, resulting in the tissues around the knee having to bear more load than they should. When you’re running downhill, this is exacerbated.  Your foot hits the ground and stops, but the rest of your body continues in not only a forward motion, but also a downward motion, requiring greater ankle flexion.

Knee Flexion at 30 degrees

The ITB rubs against the bony bit at the side of your knee (the lateral epicondyle) just after your foot hits the ground. This rubbing happens when your knee is at or slightly less than 30 degrees of knee flexion. With downhill running, your knee is a bit straighter when your foot hits the ground than it is when you’re running on other terrain. Your foot also hits the ground with greater impact than in level or uphill running. You’ll find your ITB is far less likely to be painful if  you’re running up hill, as your knee stays more bent whilst your foot is on the ground.

At least at first. If you bury your head in the sand and don’t seek treatment, you’re likely to end up with pain 24/7.

Risk factors and causes of  ITB Syndrome

Weak Hip Abductors?

No-one really knows for sure what causes the ITB to give you pain. Some research shows ITB pain goes hand in hand with weak hip abductor muscles (they’re the muscles that take your leg out to the side and help to stabilise your pelvis). Whether the weak abductors are actually the cause of the ITB pain or the result of the ITB probem is uncertain.

One often cited study showed that of the 24 runners in their study with ITB issues all showed hip abductor weakness in their bad leg. The group then did 6 weeks  6 weeks of strengthening of their hip abductors and at the end of that six weeks 22 of them were pain free and could return to running. 

But here’s the thing – they also took anti inflammatory drugs, undertook massage and stretching to loosen off and normalise the tissue in their legs, and stopped running. The researchers really had no idea whether the strength training “cured” the ITB issues. Nor did they know if the weakness in the subjects’ abductor muscles was the cause of the ITB pain, or in fact the ITB problems caused the weakness in their abductor muscles. 

Other risk factors

  • runners with ITBS versus a non injured control group were less experienced, were doing greater weekly mileage, and had a greater percentage of their training on the track
  • Weakness in knee flexion and knee extension (bending and straightening of the knee) in people with ITB issues
  • Training on cambered roads might cause ITB problems
  • Bow legs
  • Thickened IT bands
  • Muscle imbalance or weakness in the gluteus medius leading to early firing, overactivation, and tightness of the tensor fascia lata and iliotibial band

Prevention

1: Avoid over training

The one thing that is certain is that ITB Syndrome is caused by overuse. So to prevent it, you need to be sure you are not doing more running than your body can handle.  To avoid over training, you need to be careful not to increase your training load too quickly.

  • Build recovery into your training plan
  • Include recovery sessions, rest days, and recovery weeks
  • Don’t add massive amounts of mileage from week to week
  • Avoid increasing mileage and intensity at the same time
  • Add variety to your program
  • Train on different types of terrains and surfaces
  • Get enough sleep

2: Get Strong

There isn’t any definitive research that shows that strength training will prevent ITB issues, but that doesn’t mean it won’t help. It makes sense to include a good all over strengthening regime in your training. It is likely it will help in injury prevention, and it’ll also make you run faster, so why not do it? Strength training for running will never be a waste of time.

Treatment

  • Get onto the problem straight away. Don’t think it will go away on its own, as it is most unlikely to
  • Eliminate the pain – this may be by ice, anti-inflammatories and/or ceasing activities which cause pain (in our case, running).
  • Massage and/or use a foam roller on the outside of the leg to normalise the soft tissue, which is likely to be tight and help the hip abductors. Do not massage directly over the focal point of the pain. 
  • Undergo a strength training protocol which strengthens the hip abductor muscles
  • Improve flexibility in your ankles through calf stretching and regularly rotating your foot through it’s full range of movement

NOTE: anti inflammatory drugs should only be taking to help reduce the inflammation, which will then make the injury easier to treat. You should not take anti inflammatories to mask the pain so that you can continue running on an injury!

If you do not see significant improvement in symptoms after a few days of self management (and this means coming off any pain killers so that you’ll know if there is an improvement) you should definitely seek advice from a physiotherapist.

Strength training exercises for ITB Syndrome prevention and treatment

Hip Hitch

Clam and Side Leg Raise

Case Study- My ITB Experience

In my own experience, massage was VERY effective in getting rid of my ITB problems. However, I got onto the issue straight away, AND it was not caused by running. I was hardly doing any running at the times – (so much so that when I told my husband I thought I had ITB problems he laughed right in my face). My ITB issues were caused by sitting at my desk too long with my legs crossed. I was sitting down one day, stood up and bang, pain in the knee. Not crippling, but bad enough for me not to want to walk too much. And sure enough, it was worse for going down stairs and down hills. I made a quick trip to my physio to confirm my diagnosis and check there were no structural issues. She massaged me to within an inch of my life, and I continued for a few days with self massage. Didn’t even have to jump on a foam roller. I did stop crossing my legs, and I didn’t run till the pain was gone.

Debunking 3 Running Dehydration Myths

dehydration and running performance

Myth One: If you don’t have clear wee you are dehydrated.

The fact of the matter is, if your wee is clear, you are likely over hydrating, or you may have kidney problems, diabetes, or other health issues.

Your body is very clever. It can defend itself against dehydration by changing the amount of water it retains. If it is retaining water, then your urine will be darker in colour. And if your urine is darker in colour because your body is retaining water, that can be a good thing. It means your body is working well to remain hydrated. Conversely, if you have more fluids than your body needs, it will rid itself of the extra water in your urine, making it less concentrated. The more we drink, over and above what our needs are, the more we wee, and the clearer our wee will be. Studies that have looked at blood markers of hydration have found the colour of your wee does not necessarily correlate with dehydration (that is, a blood sodium level of over 145 mmol/L.

As far as wee colour goes, something not clear, and not dark as tea, is where you want to be (as long as you have no medical conditions which will effect your hydration status). If you do have persistently dark wee, or persistently clear wee which can’t be explained by the amount you drink, you should see a doctor.

Myth Two: If you don’t drink water during a race, your performance will suffer

Used to be, people would say if you wait until you’re thirsty to drink, it’s too late-you’re already dehydrated and your performance has already been impaired. It seems that the body can cope much better with temporary dehydration than was previously thought. Taking water on board based on how you feel is more important than replacing every drop of fluid you use.

A couple of recent studies highlight this well.

One study had 23 female recreational runners do two 15km time trials, in mild, but humid conditions (68 degrees F/ 20 degrees C,  87% humidity). In one of the trials, they drank 12 oz of water during the run (about 350mls), and in the other they simply rinsed their mouths with water and spat it out, every 3kms.

The results were interesting. The time trial results of the two groups were pretty much the same – the drinking group averaged 79.8 mins and the mouth wash group averaged 79.7 minutes for the 15k. The drinking group sweated more, and the mouthwash group felt thirstier after the run. The study also looked at a group of responses called “affective responses”, which looked at things like pleasure, arousal, energy, calmness and tension. Again, the responses were fairly similar on most measures, but the mouth wash group did report more tension.

So, under these conditions the runners didn’t need to consume water to maintain performance. Note that the temperature was fairly mild. It’s not at all unusual in Australia to be running in much hotter temperatures. I’m not suggesting you shouldn’t drink if you feel like you need to. I am suggesting that we don’t need to drink as much as we think we do, and if your gut feels like it can’t handle any more water, you could just try rinsing and spitting instead. You might actually be better off pouring the water over your head to cool you off!

A 2010 study (sponsored by gatorade) compared runners over a series of four trail runs. One group drank 200mls of water in the 22 hours prior to the runs, and no water during the runs, and the other group went into the runs well hydrated, and drank during each run. The results showed impaired performance for the non drinkers. Note that these runners with impaired performance started the run already dehydrated, as compared to the other studies which were done with runners who had normal hydration levels prior to the experiment.

Myth Three: Loss of body weight during a run means you are dehydrated and your performance suffers

Changes in body weight when you are exercising hard are not only caused by fluid loss. You burn fuel when you run, and when that fuel is used up, then you weigh less. As your race or training run progresses and you use up stored carbohydrate and fat your weight will drop. Not only that, as you burn calories during your run, you’ll also be liberating some water, which becomes available to you body. Another fact to consider is that as you lose body weight during a run due to fuel burning and fluid loss, your lighter weight will enable you to run faster – up to a certain point of course.  You don’t want to deliberately dehydrate yourself in a bid to lose body weight to help you run faster!  I’m just saying that all these little things add up to going some way to explaining why reduced body weight is not the best predictor of performance. The purpose of drinking during exercise is to keep your blood plasma levels stable, not to keep your body weight stable.

A 2016 study had well trained athletes run a 20k time trial in the heat. One group drank as much as they wanted to during the run, the other drank a set amount of fluids based on pre-determined individual needs, designed to replace as much of their sweat loss as possible.

The “drink when you want” group lost 2.6% of their body weight, whilst the well hydrated group lost only 1.3% of their body weight during the time trial. As you’d expect, the group who were drinking deliberately lost less body weight than the “drink when you want” group. Nothing to see there. But here’s what’s interesting. The performance of the groups was very similar. The hydrated runners averaged 1:44:39, and the “drink when you want” runners averaged 1:44:09. There was no difference in core temperature between the two groups at any point.

Haile Gebreselassie, one time marathon world record holder and all out running legend lost 9.8% of his body weight when he won the Dubai marathon in 2009. One study looked at the fluid intake of 9 major city marathon winners, and 1 second place getter.  It showed a body weight loss of between 6.6% and 11.7%, including including Gebreselassie’s 9.8% loss in 2009. Seems you can get some pretty good results, even if you lose quite a bit of weight during a race!

A Few Tips on Hydration

  1. Drink water when you are thirsty, all of the time, not just when you are running. That way you’ll go into a run well hydrated.
  2. For runs of 60 minutes or less, it seems you probably don’t need to drink much, if at all, unless the conditions are hot and humid. What feels “hot and humid” to you will depend on the weather conditions you are used to running in, your age, and your body size and composition.
  3. Experience will help you find the ideal hydration strategy for you. Around 500mls of water each hour once your runs are longer than 60 mins is a good starting point.
  4. Drink when you are thirsty during your run – water availability permitting. You might find you have to be a bit flexible on this if you are not carrying water with you.
  5. Choose a route where you know there will be water available to you, or do a loop course and stash a water bottle somewhere, or leave it in your car.
  6. If you plan to carry fluid with you in a race, it’s a good idea to train with what you are going to carry to get used to how it feels.

DISCLAIMER: Any information contained in this document is obtained from current and reliable sources and is solely for the purpose of interest and information.  Individuals receiving this information must exercise their independent judgment in determining its appropriateness for their particular needs. The information and training advice is general in nature and may not be suited to the recipient’s individual needs. Medical advice should always be sought when starting an exercise program. As the ordinary or otherwise use(s) of this information is outside the control of the author, no representation or warranty, expressed or implied, is made as to the effect(s) of such use(s), (including damage or injury), or the results obtained. The author expressly disclaims responsibility as to the interpretation of the views contained in this article, ordinary or otherwise. Furthermore, the author shall not be liable for any errors or delays in the content, or for any actions taken in reliance thereon. The author shall not be responsible for any damages resulting from use of or reliance upon this information. Readers of this document are solely responsible for compliance with all laws and regulations applying to the use of the information, including intellectual property rights of third parties.